Wednesday, August 1, 2012

The Ruffled Tee-shirt Dress

          The photo at the beginning my last post, which shows "Rosebud" has been our most popular kit for this entire year! It is precious and best of all, it takes no time at all to make it. So, today, I am going to share with you how I make a ruffled tee-shirt dress. You will need a tee-shirt ~ naturally! ~ and some ruffle fabric. The quantity will depend on the size and whether you want to make a midriff or drop-waist dress. After you decide which style, measure your child (from either the midriff or the waist) down to the desired finished hem length. Remember you do not have to hem ruffle fabrics, so this last measurement IS the final length. I  suggest that you make it slightly longer than you might think - one or two rows of ruffles should suffice. It is easier to cut off a row or two rather than add some rows!

So, the first step is to measure your tee-shirt from each side at the arm hole down to where you want your ruffle "skirt" to begin and mark. I love to use the pink SEWLINE marking pens.

Measure from the armhole down & mark.

Measure from both side and place your ruler across both marks.
Draw a line from marking to marking and cut off your tee-shirt!
Your tee-shirt is now ready.

To cut the ruffle fabric, cut between two rows of ruffles, parting them to each side so that you do not accidentally cut off a ruffle.

Apply WONDER TAPE to one of the selvedge.
Remove paper backing.
Press the other selvedge on top making sure
that your ruffles are lining up.
Then stitch up your seam!


Now you are ready to run a gathering seam at the top edge of the ruffles. Not on top of a ruffle, but rather in the space between two rows of ruffles. Note which way your ruffles run. Some ruffle fabric the ruffles look the same no matter which way you hold them. While others it is quite obvious that they only run one direction.


Gather, distribute the gathers evening and pin the "skirt" to the tee-shirt.
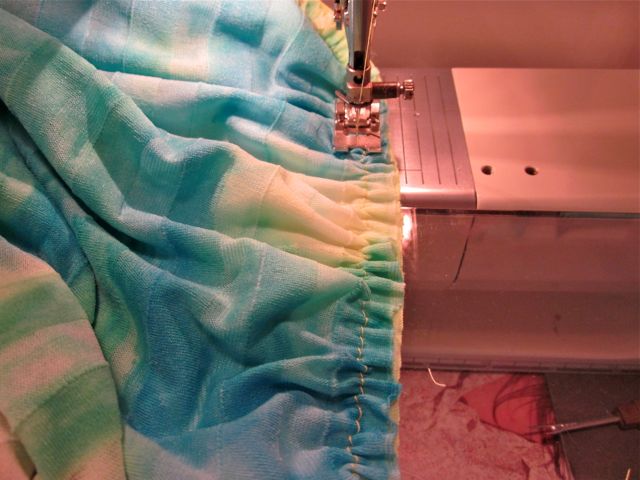

Lengthen your stitch length to a 3 and attach the skirt to the tee.


It is up to you if you would like to finish your seam. I have found that I prefer to use an overlock stitch on my sewing machine rather than my serger as it seems to add a little less bulk and does not stretch the seam ~ which might cause it to pucker. And, I really do not like to leave my seams unfinished! However, nothing is wrong with leaving them as is as they will not ravel or fray.

Voila you are done! Yes, that is all there is to it!


Next I will talk about making a flower and embellishing the top of the tee-shirt.


Tuesday, July 24, 2012

Sewing with Ruffle Fabrics!


Rosebud, our most popular kit for 2012!
Ask anyone in the shop is I like these new Ruffle fabrics and they will tell you that Lorene LOVES them and has gone ruffle crazy! Yes, I cannot even begin to count how many things I have sewn in the last few months. They are so easy to work with and sew up super quick! I love the feel of them too ~ they are really soft and drape incredibly well . . . AND, they are not bulky! I recently made a short skirt using a nude color and wondered if I could use it as a slip. I wore it under an unlined linen skirt - it did not "show"! 

So, just what is this new fabric that has popped up everywhere seemingly overnight? 
Well, it is a knit. I am not sure how it is made as it is practically double layered - that idea does intrigue me. Most of the ruffle fabrics that you see on the market and in the department stores are made up of a blend of polyester, nylon with lycra. There are a few that have a small amount of rayon in them as well some with cotton - they almost feel like a tee-shirt jersey. So, considering the fiber content, they are definitely washable, although I would highly recommend hand washing on putting them in a lingerie bag and washing on the delicate cycle. Do NOT iron them. If you really need to press your seams or get all of the ruffles going in the same direction (because perhaps they have been folded up), do use a pressing cloth with your iron set at a cooler temperature than you normally use. 

As to "how to sew" with them, use a ball point needle as they are a knit. Lengthen your stitch length to between a 2.5-3 or use a stitch on your machine designed for knits; you could use wooly nylon in your bobbin. Both of these suggestions will allow the fabric to stretch a little along the seam lines. And, speaking of seams, choose a pattern with very few and let the fabric itself be the "design". For your seams finishes, you could also zig zag them or serge with a fairly open stitch. Most of the time, I use the entire width of the fabric so my selvedges are my seam finish.  If you do not finish your seams, it really is not a problem - it is not going to fray or ravel. But, it can snag, so do not send your little one out to climb trees wearing their new little skirt! But do apply some lotion to your hands if they are dry before working with the fabric ~ and make sure that you do not have any rough places on your fingernails!

Sew It Up's Petticoat Skirt!
A couple of other queries are to whether to interface and/or line the fabric and how to hem it. So far, I have not chosen any patterns that would require interfacing. I love making skirts! I have had several customers make tee-shirt tops and shells though and I have thought that perhaps a little clear elastic on the shoulder seams would be beneficial. Any fusible interfacing would probably distort the garment rather than stabilize it. As for lining, well, there are some of the ruffle fabrics that are more "see thru" than others. Most of the time I wear a slip anyway, so no need to line! As for hemming  . . .  you are going to love this! No hemming required! The knit curls up on itself on the "last row". Your "hem" stays soft and flexible. If you were to try to hem your garment, it would just be too stiff for the fabric in my opinion.

Are you ready to try sewing with it? So, besides making little tee-shirt dresses such as Rosebud shown above or the Petticoat Skirt, what can you make with it? Oh, my gosh . . . its almost like what can you not make with it! I'll give you a few more ideas later this week ~ promise!


Monday, June 25, 2012

Two BIG Sewing Shows in one weekend!


Lots of NEW kits!
                       Yes, I totally should have my head examined! This past weekend Sew It Up took up four booths at Martha's Sewing Market at the Arlington Convention Center here in Texas. I lead two workshops for the pre-day Sit'n Sew; both working with the ruffle fabrics. Then between Thursday and Saturday I presented four seminars a total of seven times! Whew! And, boy were we ever busy!!!

                        Here are a few pictures of our booths. Many thanks go to Janice, Linda and her husband as well as my own husband. I was teaching so I nearly missed all of the "fun". But, after my workshops, I did get to enjoy the "set up"  for a couple of hours. Yes, it was a very long day as my alarm had gone off at 5am!

Look! ~  more NEW kits!
Some of our "goodies"!
Boy, were we busy!
Can you see Kay Whitt shopping in our booth!
                  Concurrently the Original Sewing and Quilt Expo sponsored a new sewing show at the convention center in downtown Raleigh, North Carolina. My daughter, Anna, lives about four hours from there so she drove down and ran a booth for Sew It Up. We shipped her fifteen boxes of goodies to display and sell.  Look at what a fabulous job she did setting everything up ~ all by herself!

Here is the center of the booth.

And, here is the right side.
                           It was a fabulous weekend! We got to visit with many of our customers who only come to Market but never to the shop. And, naturally, we met a lot of very nice new people! Of course, you should see the tear down of these booths - its funny how it an take hours and hours . . . all day as a matter of fact . . . to set up the booths, but it only takes about two hours to pack it all up.

Ah, the end is in sight!
                         I would like to thank all of our helpers as well as my workers for this year  - they are the ones that made it all possible - Thank you, Anna, Janice, Linda, Mary Ann, Madeleine, Joline, Shaun & Denise!

                        And, you will never believe it, but as I return to "reality",  I see an email from Quilts Inc. ~ they manage the International Quilt Show that takes place in Houston every fall. They are asking for my paperwork. And, just this afternoon, I received my first email regarding the Sprint 2013 show from the University of Washington regarding THE Sewing Expo ~ the one in Puyallup, Washington! Hmmm . . . so much for a reprise! 

Wednesday, June 20, 2012

The Pleated Twirl Skirt for Dolly

One of our most popular patterns is the pleated twirl skirt, we usually come up with a new kit every season.  The skirt is easy to make and so cute.  I decided that dolly needed one too so I developed the pattern for the 18" doll.


Cutting out:

Skirt- Cut (1) main fabric 4” x 31”

Yoke -  Cut (1)  4” x 14”

Skirt Ruffle- Cut (2) 2 1/2” x width of fabric

Top Ruffle- Cut (2) 1” x width of fabric

Sewing Notes: 1/4” seam allowances
Yoke ~ Sew short ends together . Fold in half to 2”, press. Topstitch 1/8” from the top folded edge. Topstitch again 5/8” from top edge. Using a seam ripper, open up the seam between the two rows of topstitching. This will be where you insert the elastic. Do not thread elastic through yet.

Skirt ~ Sew short edges together. On the top of the skirt, clip every 1 1/2”. With right sides together, fold the skirt fabric at each clip and stitch 1/2” away from clip and 1 1/2” down. Do this all around the top edge of the skirt. Press these open from the back so that they look like small box pleats. Run a gathering stitch around this same area. Gather softly to match the circumference of the yoke that you just finished. There will not be many gathers Pin and sew together.

Ruffle ~ Sew the two strips together; you now have a circle. Stitch a rolled hem (or satin stitch) along the bottom edge.  Gather the top edge to the circumference of the skirt. Pin to skirt. Sew. Serge seam.

Top Ruffle ~ Sew the two strips together at both selvedges (you      now have a circle). Stitch a rolled hem (or satin stitch) along both edges. Run a gathering stitch in the center. Gather the ruffle to the circumference of the skirt. Sew ruffle on the top of the skirt where the skirt meets the ruffle.

Thread a 15” piece of 1/4" elastic through the casing, fit it to the doll and sew the ends together.

Now dolly can match her girl!

Tuesday, June 5, 2012


Saturday was our Grand Opening Celebration! The shop looked fabulous (if I may say so) and was full of wonderful sewers all day long. Kay Whitt brought us lots of her gorgeous samples early in the morning ~  giving us plenty of time to decorate.  She has the most amazing talent and not just for designing her own line of patterns; Serendipity Studio. Her selection of fabrics is stunning and boy, can that girl sew!  Many designers have others sew up their patterns, but not Kay. She does all of her sewing and does it impeccably. Everyone had a wonderful time visiting with her. She is a delight!  And getting to look at her garments and bags up close was a real treat. She even wrote a blog post about her day with us which was quite complimentary. Everyone should go read it! She has some great pictures.


Jane Stewart, who is my rep from Moda Fabrics, also was in attendance. She was demoing some of her favorite notions in our new classroom and had a stack of yummy newly released books to peruse. She has been ever so helpful to me over the last few weeks getting us stocked up with only the best! Why she even came out to the shop about a week ago and spent several hours helping us get our notions wall all pretty. I am so grateful to her.

Naturally, I had stressed all week trying to get everything done in time, but I did had a lot of help. Many thanks go to Janice, Linda and my hubby! He was even doing some last minute painting on Friday. All of us are very proud of how Sew It Up Studio has shaped up. Of course, I have a lot more plans for the shop over the course of the next few months . . . :)


Thursday, May 10, 2012

Our Banner is up!

             
               Yeah! On Monday evening - finally, our sign company arrived with our 15" long banner. It is beautiful! And, certainly eye catching. I think it is the needle! The sign is definitely noticeable from the highway. We have been super busy all week with lots of wonderful new people dropping in to check out the "new shop on the block." Everyone has been thrilled to find out that we are actually a real fabric store! That is what they are saying! Well, of course, we are! What exactly is an un-real store? I suppose they are referring to the big box fabric stores that predominately sell crafts these days. Hmmm . . . .

Here are a couple of pictures of the sign guys putting up our banner.
Measure twice and hammer once ~ see the tape measure up there!


Yeah, man, it is looking good!


And, after the banner was up, they cleaned the windows and added our door art.
Sew It Up Studio!
I love our new name. Once again, I think it is the needle that really makes it! And, the shop hours are now posted next to the door. We even had our street number above the door remade. All nice and new!

                     This is the third and final time for me to move the shop to a new location. Each time I forget how labor intensive it is; I suppose that is a good thing. Kind of like delivering a baby. If we remembered how painful it is, we would probably not have any more children! This shop is really looking good. All of our trims are now unpacked and beautifully displayed. The button cabinet is beautiful and, believe it or not, our classroom is nearly empty of boxes. We are currently working on the class calendar. Our new "back-up" cutting table is being stained and will be installed this Sunday. There is still furniture to be repainted; perhaps that will happen this Sunday as well. Ah, I can finally see it coming together. Which is a good thing since we are going to have a Grand Opening Celebration on Saturday, June 2nd!

I'll post pictures of the inside next!

Friday, April 6, 2012

WE HAVE MOVED!

SEW IT UP STUDIO HAS MOVED! 

OUR NEW ADDRESS IS:
MAYFAIR VILLAGE SHOPPING CENTER
740 GRAPEVINE HIGHWAY, HURST, TEXAS

THE BEFORE PICTURES:
The carpet is out and the walls are coming down!
  

                  Boy oh boy does it take a lot of work to move an entire store!  Of course, it is not just a matter of packing up the merchandise and transporting it to the new place. No, no, first you must tear down and renovate the new place! I knew the new location had great potential . . . and after tearing out seven walls, removing tile, ripping out the old carpet and linoleum, hauling off all of the debris, replastering, painting and replacing every single light fixture, it was finally ready to move into. And, who did all of this labor???  Why, my husband! ~ the most supportive, loving man that I know! He truly believes in me!


Here are some pictures the shop now ready to move in. . . .  some of the fixtures have been moved over.


This will be our classroom someday soon! 
Check out how high these boxes are stacking up!


And, then we started moving the fabric! It was amazing that we had so much to move. Hundreds and hundreds of bolts - we should have counted them!
So, we started getting the fixtures situated and putting the fabric and trims out.

Each day, it gets better & better! We have new gorgeous white shelving.


And, now we are getting our huge assortment of patterns organized!


Look - how pretty! Our samples are now out on display for our kits!


Here is a picture of the outside of the shop - NO SIGN YET! but hopefully our banner will arrive soon!