Friday, December 21, 2012

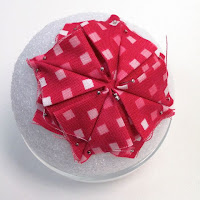
Origami Christmas Ornaments


  We have been having a lot of fun here at Sew It Up Studio.  Last Saturday we had an ornament workshop and we thought it would be fun to share the directions with all of you. 
We still have a few kits left which include everything you need to make your very own ornament!


Origami Ornaments 

In your kit:

    A box of straight pins - at least 300
    120 two inch squares – at least 60 of each color
    3” Styrofoam ball

You might also like to use a thimble for pushing the pins and a small glass or the base of the pin box to hold the ball steady while you work. 
General Instructions 

After the base unit all of the squares will be folded the same throughout.  When pinning each row you will just pin the 2 outer corners.

 
Instructions for the Straight Row Ornament

First fold the light color in half and then half again to form a 1” square, finger press and unfold and lay it on the ball and pin each corner.
 You will used the pressed lines as placement lines for the next round.


Round 1
With the same color fold the square in half to form a rectangle then bring the corners to the center to form a triangle, finger press.  Lay this piece with the folded tip at the center of the base square with the edges along the previously pressed lines – pin at all three corners without pushing the center pins in completely. Repeat 3 more times until the base square is covered and all tips meet at the center.


Round 2
Using the other color fold as before and line up the tip about 1/8” lower and centered in the space between the previous row, repeat this 3 more times around.  Remove the center pins after round 2 is complete.
Round 3 to the end
Repeat round 2 changing colors for each round until you have covered the ball with about 13 - 14 rounds of each color.


To Finish
Take a square of the last color used and fold under 1/8” on all sides and pin over the raw edges at the top.  Pin a hanging loop and bow to the top.


Instructions for the Spiral Ornament

Fold the light color in half and then half again to form a 1” square, finger press and unfold and lay it on the ball and pin each corner.

Round 1
With the same color fold the square in half diagonally to form a triangle then fold again to form a smaller triangle, finger press. Lay this piece with the folded tip at the center of the base square with the edges along the previously pressed lines – pin at all three corners without pushing the center pins in completely.  Repeat 3 more times until the base square is covered and all tips meet at the center. 


Round 2
Using the other color, fold as before and line up the tip about 1/16” down from the center and centered in the space between the previous row, repeat this 3 more times around.  You will want to keep the folded edge on the same side for the whole ornament.

Round 3 to the end
With color 1 folded the same come down about 1/8” from the tip of the previous color , line up the edge with the round 1 piece and pin in place.  Repeat all the way around this row and then repeat row 3 alternating colors until you reach the other end about 13 – 14 rows of each color.


To Finish

Take a square of the last color used and fold under 1/8” on all sides and pin over the raw edges at the top.  Pin a hanging loop and bow to the top.


These ornaments will take about 2 hours to complete but it is a project that can be done with a group of friends or while watching a good Christmas movie!  Enjoy and as always

Happy Sewing and Merry Christmas,
Linda

Friday, November 30, 2012

Our Holiday Open House "TOUR"!


                                                                                                                                                                                         Our Holiday Open House last night was soooo much fun! Lots of our customers stopped in for Cider and Cookies and boy, did they bring "Show & Tells"!  I took lots of pictures before anyone showed up and again of the actual "Show & Tells." As always, you never get all the pictures that you intended, but I did capture quite a few. So, I though that I would post a blog with mainly pictures for all of our customers who could not make it last night and for those who order from us, but wonder what it Sew It Up really looks like! Here is our beautiful PINK Christmas tree! And below are pictures of what we put under our tree as gift ideas . . .  Charm packs & fat quarter bundles of quilting cottons. the lighted magnified seam ripper, woolen pin cushions, books, patterns & more!


We have TONS of NEW fabric that we don't even have on our website yet, so that will be my job this weekend ~ as well as posting the first quarter of the 2013 Class Schedule! Eeks, lots of typing! Nonetheless, here are pictures of our fabrics, kits and some of our ribbons and trims.
Kits & Fabric!

New Fabric Display; 2 more on their way!

Ribbons & more ribbons!
Flower Brooch Display & Kits

One of our pattern walls.

New "Juggling Summer" Collection


One of our cutting areas.
I also took several pictures of the numerous Show & Tells! They were amazing! We are so proud of all of our customers and sewing sisters!


And, I will sign off with a picture of Sew It Up Central: the desk!


And, a shot of our front door ~ all decorated, of course!


Happy Holidays everyone!

Monday, November 12, 2012

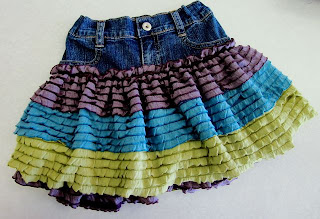
My Diagonal Ruffle Skirt!

         The night before I left to go to Houston for Market/Festival, I had to make a new skirt! I am sure that you understand . . . even though I was planning on getting up at 4:30am and it was already past 7:00pm . . . . 
             My plan was to make another one of the "Coastal Skirts" in the NEW Smoke ruffle fabric that had just come in. We even had received this awesome wide, but very soft and stretchy, waistband elastic! I asked one of my helpers to cut me off a couple of yards. Unfortunately, when I laid it out on my table at home, it was slightly less than 2 yards. Hmmm . . . .  yeah, hmmm, it right. When I measured my waist and divided by 2 and measured the length that I wanted the front to be, it was going to be right at my knee. Oh, dear! This is not the look that I was after. So, "Necessity is the mother of invention" or rather, my favorite:  this was going to be design opportunity!
              So, I studied it and studied it. I did not want to drive back to the shop that evening and cut more fabric. It needed to be in one single cut and I was not going to waist any fabric! So, I thought, there must be a way. I finally decided that if I cut the waist opening on the diagonal; rather than leave an opening in the selvedge. This was going to work much like cutting off the tip of an ice cream cone.  Then I would have the overall length that was totally necessary to be able to wear with my black books. I decided to be brave and go for it. I had no idea if it was going to work or hang right until I put it on; hence I needed to complete the project to determine its success.


But, it worked! And, I have published it in my new book, "Sewing with the New Ruffle Fabrics" http://www.sewitup.com/shop/Publications/font-size3bSewing-Books/p/Sewing-With-Ruffle-Fabrics-BookSIU-x868315.htm

Send me a picture of your skirt!

Lorene

Thursday, November 8, 2012


Whew! The Houston Quilt Festival was amazing! We were so busy and sold out of so many items!!! We got to visit with many of our sewing sisters and meet a great many new ones - ah the memories!

Before the Festival I was cranking things out of my studio so fast I did not even take the time to write out the patterns. One "cutie" that I had made a couple of weeks ago for a class on how to make a  striped ruffle fabric skirts, was a big hit. Now, I did not even ask the shop to make up any kits until the Saturday before the sewing show. Luckily they had just cut a kit for a regular customer who had seen the skort hanging in the shop. So, it was not difficult for them to replicate it and bring a box of them to the show. They named the little skort "Playtime" which fits it perfectly! And, we sold out the first day!

Unfortunately, I had also told the shop that I would write up the directions and print them out in my hotel room to add to the kits. Well, as soon as I said that I promptly forgot all about it! Eeeks, too many things on my mind! 

So, for all of you who purchased the kit at the show, I have published it in my new book "Sewing with the New Ruffle Fabrics"! 
http://www.sewitup.com/shop/Publications/font-size3bSewing-Books/p/Sewing-With-Ruffle-Fabrics-BookSIU-x868315.htm


PS. I think that the colors in this little skirt are better in "real life"!

Thursday, November 1, 2012

Houston Quilt Festival

Last night was preview night for the Houston International Quilt Festival. Our booths looked great!


This was after approximately 12 hours of unloading, unpacking, setting up and decorating!
Today was the very first full day. It was a fabulous day as we got to see so many of our wonderful customers; not to mention that our booths were packed all day into evening. We are all tired  ~ but it is a Good kind of tired:) Only three more days!

I have just a few more booth pictures from the Market that I shot on Monday that I really wanted to share with everyone. Here is a very cute booth by a brand new company called Skipstone. We have most of their patterns ~ including the most precious Kitty! See her near the middle of the photo.


I thought that this booth by Me and My Sister (designers for Moda Fabrics) had a novel booth ~ showcasing her newest line of fabric due out late Spring.


And, finally, one of my very favorite visits of all was with Weeks Ringle!
She is the one that inspired me to open a Modern Quilt shop!
Look at those quilts!!!!!!!


TOTALLY AWSOME!
Oh, and see the quilt to the left . . .  
I ordered practically the entire collection as it was designed by Weeks herself for Andover Fabrics!


Sunday, October 28, 2012

Fall Quilt Market in Houston!


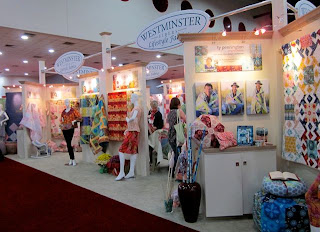
Westminister Fabric Booth
     I am in Houston now and attending the Houston Fall Quilt Market! Next week will be the International Quilt Festival, where we will have two booths ourselves to show off all of our new kits and goodies!  Yesterday was the first day and, as always, it is huge, overwhelming and wonderful! All of the fabric manufacturers are here, with their designers, showing off their fabulous new lines! To the left here is the Westminster group of booths; they are Rowan and Free Spirit Fabrics. Surrounding their space are all of their designers in their own specially decorated booths.

Here are a few pictures of some of them! The first two are from Amy Butler's new collection: Alchemy.


Tula Pink's new Salt Air
 
Here's Tula!

Anna Maria Horner's new Field Study
               
That's Anna Maria in the long skirt!

                   It is thrilling to meet all of these wonderful designers and see their new lines made up in their own choices of patterns and fabrics. I even had lunch with Deb Strain who designs for Moda yesterday. Ah, so many new ideas!

Liberty of London!

                           This was probably the booth that I got the most excited over though. Liberty of London has a new line of cottons for quilters that is gorgeous! I did order a nice group of them, but they will not be in the shop until March:(  But, I promise you that they will be definitely worth the wait!!!

                                    I should have taken a lot more pictures, but I will leave you with one more of my friend Julie Creus who is the designer for La Todera patterns. I love her flowers! She is fabulous!

La Todera's booth

Well, I am off now for more Market - I have another class this evening, so another long FUN day!