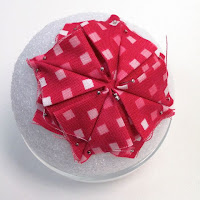
We still have a few kits left which include everything you need to make your very own ornament!
Origami Ornaments
In your kit:
A box of straight pins - at least 300120 two inch squares – at least 60 of each color
3” Styrofoam ball
You might also like to use a thimble for pushing the pins and a small glass or the base of the pin box to hold the ball steady while you work.
General Instructions
After the base unit all of the squares will be folded the same throughout. When pinning each row you will just pin the 2 outer corners.
Instructions for the Straight Row Ornament
First fold the light color in half and then half again to form a 1” square, finger press and unfold and lay it on the ball and pin each corner. You will used the pressed lines as placement lines for the next round.
Round 1
With the same color fold the square in half to form a rectangle then bring the corners to the center to form a triangle, finger press. Lay this piece with the folded tip at the center of the base square with the edges along the previously pressed lines – pin at all three corners without pushing the center pins in completely. Repeat 3 more times until the base square is covered and all tips meet at the center.
Round 2
Using the other color fold as before and line up the tip about 1/8” lower and centered in the space between the previous row, repeat this 3 more times around. Remove the center pins after round 2 is complete.
Round 3 to the end
Repeat round 2 changing colors for each round until you have covered the ball with about 13 - 14 rounds of each color.
To Finish
Take a square of the last color used and fold under 1/8” on all sides and pin over the raw edges at the top. Pin a hanging loop and bow to the top.
Instructions for the Spiral Ornament
Fold the light color in half and then half again to form a 1” square, finger press and unfold and lay it on the ball and pin each corner.
With the same color fold the square in half diagonally to form a triangle then fold again to form a smaller triangle, finger press. Lay this piece with the folded tip at the center of the base square with the edges along the previously pressed lines – pin at all three corners without pushing the center pins in completely. Repeat 3 more times until the base square is covered and all tips meet at the center.
 Round 2
Using the other color, fold as before and line up the tip about 1/16” down from the center and centered in the space between the previous row, repeat this 3 more times around. You will want to keep the folded edge on the same side for the whole ornament.
Round 3 to the end
With color 1 folded the same come down about 1/8” from the tip of the previous color , line up the edge with the round 1 piece and pin in place. Repeat all the way around this row and then repeat row 3 alternating colors until you reach the other end about 13 – 14 rows of each color.

To Finish
Take a square of the last color used and fold under 1/8” on all sides and pin over the raw edges at the top. Pin a hanging loop and bow to the top.
These ornaments will take about 2 hours to complete but it is a project that can be done with a group of friends or while watching a good Christmas movie! Enjoy and as always
Happy Sewing and Merry Christmas,
Linda


No comments:
Post a Comment