Wednesday, July 6, 2011

The 4th in Rico, Colorado


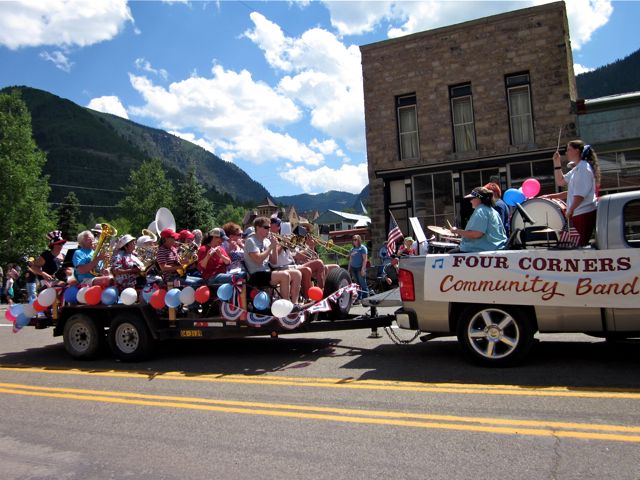
Rico has a great small town 4th of July Parade!
         
            Naturally I was playing, visiting and cooking up a storm on the 4th so I did not have an opportunity to share my pictures as I had hoped. Every summer my husband and I make a pilgrimage to southwest Colorado to rest and find ourselves again.  In 1975 my father-in-law built a log cabin in Rico, Colorado for all of the family. He is longer with us and as of a couple of weeks ago, neither is the mother of his children. We feel their love in this cabin. We spent our honeymoon here in 1976 and subsequently brought our children and their friends here.  Indeed I always feel like I have “come home” when we vacation here. Someday, in the not too distant future, we will retire in this same area. 

A REAL vintage fire truck!

The old mining town of Rico is very very small. The Delores River, as well as highway 145, run through the town with homes on both sides.  There is no grocery here; just a gas station, a small post office, an elementary school, the old town hall and a liquor store. A couple of years ago a drive-thru coffee hut opened (surprisingly, and fortunately, it is still open) and this summer a small bistro/laundromat  has opened for business,  its called "Dew South".  Yes, it is a small town, but on the 4th of July it is like Christmas here – except no snow! ~ They had snow this year through May!


There are antique cars too! . . . and town divas!
People come from miles aroud to celebrate the 4th here. They gather for the parade. It is quaint, but I would hate to miss it. The volunteer fire department is out in full force “passing the boot” and selling Duck Race tickets to fund their spectacular fireworks show. Immediately following the parade, the highway is opened back up for traffic. Yes, all thru traffic must patiently wait the mere 20 minutes it takes for nearly half the town to parade down Main Street! Immediately following, the “crowd” ambles down to the elementary school for the combination Arts & Crafts Sale, Library Book Sale & Quilt Show! From here you go down to the fire station for breakfast. A local Indian tribe prepares some kind of mouth watering breakfast taco – if you want one, be prepared to stand in a long long line. But, fear not, the local community band seranades you while you wait.

Of course, all of the neighboring Boy Scouts got to march in the parade!


Check out this wonderful float!
Before going to the Fire House to serenade the hungry folks, they get to be in the parade too - naturally!

I think that this may be the local princess!!!!


Even tiny town divas - in their own cars!
There is a picnic in the park later in the afternoon, but not until after the Duck Race! I wouldn’t want to miss this event either! At about 1:30 approximately 500 yellow rubber ducks are “released” off the highway bridge. Each has a black number on their belly. About a quarter of a mile downstream everyone gathers at a small bridge to watch them be scooped up in nets by the local firemen and their wives. The men stand barefoot with their pants rolled up. Their wives sport stylish wet suits . . . the temperature of the water is about 40. As they catch the cute little yellow duckies they yell out the numbers of the first 25 or so as the winners of the race. Yes, there are prizes! Everyone, including the entire dog population, either stands on the bridge or on the banks cheering wildly. I know the race seems really lame, but it is a custom here & the childish simplicity of the event has been come dear to me. 
Catching those speedy Rubber Duckies!
One of the locals taking in the Duck Race!


At dusk the locals and visiting campers commence shooting off their personal arsenal of fireworks. We sit out on the front porch of the cabin, slightly above town, snuggled in wool blankets (it is in the 50’s by now) in anticipation of the highlight of the 4th of July festivities. Soon we spot several truck headlights heading up a mountain across the valley on an old mining road. We know that these are the same talented Duck catching volunteer fire and rescue men that will now conduct “the show”. I never pay any attention to how long this takes them to set up as there is so much other fireworks going off all over town. One year someone lit a bar of magnesium down by the river. We all thought that some camper was attempting to burn up the town. It was just a little added excitement for the evening! As darkness envelops us, a million stars magically appear. They seem brighter on the 4th somehow. Finally the show commences with a thunderous introduction of the BIG fireworks. Obviously, this is not more of the same from the townfolk! If you have ever experienced the sounds and brightness of fireworks in the mountains, then you know what I mean by the resounding echos that reverberate throughout the valley. It is awesome and we enjoy the spectacle for nearly an hour. We are mesmerized. Then we scramble back inside to warmth and fresh peach pie and vanilla icecream. Can it get any better? I hope that all of you had as much fun as we did!
Happy 4th . . . belatedly!  . . . here are some the awesome fireworks pictures that I took!


Monday, May 23, 2011

Here's a Super Cute Skirt!

The Super Cute Skirt!
       Several weeks ago I was out "window shopping" for ideas. I am always on the lookout for anything that I might want to "figure out how they did that"! I was at a local discount clothing boutique and was totally unenthused as I could find nothing new, clever or stylish . . . until I spied a cute skirt hanging on the back wall. I almost bought it as was under $30, but the sewer in me said, "No, you can make that for probably less and definitely in a much cuter and better quality fabric." It wasn't that it was sooo different, but the fact that it was made out of a knit intrigued me. I have never made a tiered skirt out of a soft drapey knit. Can you believe it? Something I have not done? The fabric really was boring and the quality was just not up to my standards. So, off I went to my favorite fabric shop - lol! Naturally, I already had a a really cool fabric in mind. A wonderful super fine rayon jersey!!! ~ in my favorite color; purple!

See how full it is!
          So, where to start? How did they make it? It was a three-tiered skirt: the top tier was the main part of the skirt with two tiers below being of equal width; each approximately 5" or 6".  I made a few mental notes. I took a picture with my phone and a took a cursory measurement. (I nearly always carry a tape measure in my purse - what sewer doesn't?, but did I have one that day? No!)  So, I proceeded to measure it "the old fashioned way": I held it up to my arm and "measured" the top tier. I pinched the elastic band between the fingers of my left hand while stretching it out to be flat with my right hand. It came just to my arm pit which gave me a measurement of 24". Multiply that by two (front & back) and maybe add in a little bit for a seam allowance ~ Nah, I was going to make this on my serger; no need. As for the length, it should be "finger tip" length: 16" for me. Yes, I am not overly tall! Okay, so add another 1" for the elastic casing at the waist + 1/4" for a seam allowance. Okay, my top panel needed to be 48" X 17 1/4".  As I said earlier the bottom two tiers were each 5-6" in length. I decided to go with 5" due to my height. I wanted the skirt to hit me just below the knee. This cute little skirt was very very full as I recalled. So, I decided that the second or middle tier should be 2 1/2 times the width of the top tier and the bottom tier should be only 2 times the width of the middle tier. After a little calculating with my phone - what would we do without these "telephones"!  Now I was ready to cut.

The fabric needs to be "drapey"!

Top tier: 48" X 17 1/4"
Middle tier: 5" X 120" (the fabric is 60" wide, so 2 strips)
Bottom tier: 5" X 240" (4 strips)

      If you would like to make one of these super cute skirts for yourself:
(A)  measure your hips and add 8" for ease.
(B)  measure what your "finger tip" length is for the length of the top tier
(C)  multiply (A) by 2.5 for the length of the middle tier
(D)  multiply (C) by 2 for the length of the bottom tier.

      Now, you are ready to sew!
(1)  Sew/serge the top tier together at the side seam & serge the top edge.
(2)  Iron down the top edge by 1"; pin and stitch leaving an opening for the elastic. I used 3/4" elastic.
(3)  Sew the middle tiers all together into a big circle.
(4)  Serge one of the edges while running a gathering stitch along the other. Mark your circle by quarters to aid you in even gathering.
(5)  Gather to fit the bottom of the top tier; pin and serge together.
(6)  Sew the bottom tiers all together into a big circle.
(7)  On both edges of the bottom tier serge a three thread rolled hem and stretch it as you sew to cause it to "lettuce" prettily!
(8) Mark your bottom tier circle by quarters to aid you in even gathering. Run a gathering stitch along one edge. Pin this last tier on top of the middle tier overlapping each by about 1/2" or less. Topstitch in place.
(9)  Remove all of your gathering threads.
(10) Insert elastic into casing; adjust to fit you; then cinch it in by 2-3" . Stitch elastic together. Close opening. Now, topstitch down the center of the elastic on top of your waistband. This will stretch it out nicely to fit comfortably.

Have fun Sewing It Up!


Thursday, April 28, 2011

Time for Summer Sewing! Here is a FREE pattern!

          Its time to start sewing for Summer! Here is a precious little sundress that you can make in no time at all for some lucky little girl. Its so easy! One of my dear sweet customers made this for the shop several months ago. She had seen a dress similar in a catalog for way too much money and knew that she could make one on her own ~ no pattern is really necessary. She used a cute little printed knit (Pink Mod Floral on our website - we still have a little). The fabric hangs perfectly and requires no slip. This little sundress would be a perfect bathing suit cover-up! Okay, so how do you make one? 
 
1.) Measure the child ~ or adult, as this works for anyone ~ from just under the arm to the proposed finished length. Now measure around the chest and then double this measurement. Cut out a rectangle to these measurements. This will be the entire dress!
Depending on the total width, you might need one width of fabric or more. If you need more then divide the number in half and cut two panels; one for the front and one for the back.
Ruffle ~ This needs to be about twice the width of the skirt. The width of the ruffle is totally up to you. This little sundress has a 4 1/2" wide ruffle. If you are making this for yourself as a "Maxi" dress, the ruffle needs to be probably about 6" wide.
Straps ~ Cut (2) two strips of fabric from 2"-3" wide by around 18" for a little girl or 3"-4" wide by  28" long for an adult.  When you attach the straps to the dress, try it on to adjust to a comfortable length. If they are too long, just cut off whatever is unnecessary.
2.) Preparation ~ First finish the following edges of your pieces with a rolled hem*  in a contrasting thread rather than hemming them: the dress at the top, both sides of the ruffle and both sides of the straps. This is much faster and is prettier by far!
*For perfectly smooth rolled hems, use wooly nylon thread in the upper looper of your serger.
3.) Sewing ~ Sew the dress together into a tube shape. Attach all of the ruffle sections together.
Close-up of bodice shirring.
4.) Shirring ~ about 1/2" down from one edge of the ruffle, shirr 3 rows about 1/4" apart with elastic thread in the bobbin of your sewing machine.
For the dress do the same, but rather than 3 rows, shirr as many rows as you want for the bodice section. 
For the straps, shirr 4 - 10 rows ~ this depends on the width of your straps.
How to Shirr: To wind the elastic thread onto the bobbin, you can start it on the sewing machine as you fill any other bobbin. Then you need to "slow it down" to fill it up the rest of the way. I just hook my finger around the elastic as it goes into the bobbin. This slows it down just enough - like a brake. To shirr, set your machine's stitch length at 4 and sew! Do not cut your threads at the end of each row. Just turn around and go back the other direction until you get enough rows shirred. After you are done at the machine, steam the shirred sections with your iron and watch the magic! It will shrink up beautifully. Do not touch the iron to the elastic thread ~ hold the iron a couple of inches above the fabric.
5.) Finishing ~ Attach the ruffle to the bottom of the dress by pinning it on top of the dress  about 1/2" above the very bottom. (The top edge will look a little like a "lettuce" edge. Cute!)
Try the dress on and pin on the straps where they are most comfortable. Stitch to attach to the sundress and you are done!!!
Post pictures of your little sundresses!

Saturday, April 16, 2011

A Quick Trip to Tucson!

      I just made a super quick trip to Tucson and back with my husband to collect a "toy" ~ for him! It was really quite nice to be "trapped" in the car with plenty of time to visit without the interruptions of daily life. I knitted, browsed magazines, help drive and laughed a lot. We stayed the first night in Las Cruces, New Mexico. It was so pretty! Desert and mountains everywhere you looked . . . and cactus, of course!  I loved the flowers that were getting ready to bloom on this cactus to your left. We had clear skies with cool crisp temperatures. Naturally after we checked in to our hotel, we ventured out to see what was in town. 


 Did I locate a local fabric store? Why, of course. I did not even look it up, my "fabric nose" just led us to it!


Did we find a great Mexican restaurant? Is there sand in the desert! 

We only stayed one night and then it was on to Tucson to pick up the new/old little motorcycle. This time a '69 Honda 90. I believe that this is #4. Gotta love a man with a hobby!

Here are a few more cactus pictures. There are really interesting to look at.


I wanted to share with everyone a few more pictures of last weekend's sewing retreat. We had so much fun that I keep thinking about the next one and what we can do!    

Mollie & Bettie and their completed projects!


Cathy, one of our novices and 3 completed garments! 


Denise was super productive!


Elizabeth with just a couple of her garments!
 

Tuesday, April 12, 2011

Our Dessert on Saturday Night


         This is what we all had for our dessert Saturday night at the sewing retreat! Its German Pecan Pie and it was delicious. Just looking at it makes me want another piece! I still have more pictures to share of our fun projects, but it is late and I am packing to go on a little trip with my husband tomorrow ~ Yeah! 


Here is the recipe for all of you to try: 


German Pecan Pie


4 egg whites beaten                                  1 t. vanilla
1 C sugar                                                       24 Ritz crackers
1 C. pecans chopped                                
Baker’s Semi-Sweet Chocolate Squares      

Put crackers in a zip locked bag and roll with rolling pin until you have an even fine grind.  Beat egg whites until stiff then slowly add sugar and beat until blended.  Stir in crackers, vanilla and pecans.  Pour into greased 9 inch pie plate.  Bake at 350 degrees for 30 minutes or until golden brown.  Cool 1 ½ to 2 hours. Cover with Cool Whip and shred chocolate on top.  Refrigerate.
YUM!!!!!


Monday, April 11, 2011

Spring Sewing Retreat!


My annual Spring Sewing Retreat was this past weekend and I think that it was the best one ever! Our projects included making Easter dresses, the ever popular Twirl skirt, a fabric flower, a sewing notions bag (or several!)  and a knit yoga skirt and/or leggings! As always, the menu was decadant and memorable ~ I do not think that I will eat now for at least a week! 

Friday Evening's Dessert


And, the accomodations . . .  pure elegance and homey~comfy! I hold our sewing retreats at the Southern Comfort Retreat House in Mineola, Texas. See how pretty it is!


Here are some photos of just a few of the completed projects:


This is Miss Lily by Samantha Caffe of The Handmade Dress ~ of course it was not handmade! ~ made on the sewing machine! I do not know why her patterns bear that name.  

And below is a little suit made using a pattern by Jackie Clark, the Baby Overalls. Isn't this a classic! And, monogrammed too!


Here is another cutie: this is a pattern by ModKid Designs, Isabel.


Many of the participants made themselves a Notions Bag:

And some people made more than one!


I’ll post more pictures tomorrow of all of our fun as well as a one of my favorite recipes from our retreat hostess!

Friday, March 25, 2011

Back Home Again!

SEWING EXPO Puyallup, WA
Janice manning the booth!
One market and three sewing expos and we are finally back home in Texas! A month is way too long to be gone from home and hubby! It is hard to believe that I left home a month ago today ~ first I flew to Seattle to attend the Northwest Fabric Show as well as THE Sewing and Stitchery Expo in Puyallup, Washington. If you have never been to this show, I think that all sewers should plan to go at least once! It is so awesome! This is one of the biggest sewing shows in our entire country. Its main emphasis is on sewing clothing as opposed to quilting; although there are a fair number of quilting vendors & classes.  I was privileged to be asked to teach again this year. I had two seminars; one on ruffles and the other one on shirring. The classrooms hold one hundred in each and all four of my sessions were full.  People come from all over the Northwest US as well as Canada to attend this venue. Lots of wonderful sewing sisters! It was so much fun ~ And, of course, our booth was super busy! I think that we are going to need more booth space next year and additional help. Janice, from the shop in Texas, joined me in Seattle for this Big show. It was critical to have someone who knew everything about our products other than me. Each year we get busier and busier in Washington.

A little over a week later, we both flew to Atlanta, Georgia for The Original Sewing and Quilt Expo. My dear sweet husband drove our truck - a twelve hour trek - full of goodies from Texas to Atlanta and even picked us up at the airport. Wow, the timing was incredibly perfect. We could not have accidentally "not planned" it any better! He even helped us set up the following day. It was wonderful to have an extra set of arms and legs to make the unloading easier. Then he returned home to rest and go to "work"! He says that my job in physically exhausting and the hours are too long! This was our second year to be in Atlanta, but this year I was contracted to teach two classes each day and do one stage presentation a day. Just like in Washington, we met so many wonderful people. The weather was better than Seattle as we went from snow, sleet and rain to Spring like temperatures! The flowers were blooming everywhere and it was so green. 


Savannah's Cane River
On Sunday, after the Atlanta show, Janice and I drove down to Savannah for a couple of days of rest and "playing tourist". Oh, my gosh, it was so beautiful!!! We walked and walked around town enjoying the gardens of flowers, the wonderful architecture, the ships, we did a little shopping and ate very well! We even got to eat at Paul Dean's restaurant! Every bite was incredible. We definitely went off the healthy eating plan that night!

Paula's 3 story restaurant!
Downtown Savanah
Then it was on down to Lakeland, Florida for our final and third show in just three weeks! By now, I had to go find some sandals as none of my shoes were going to work for temperatures in the eighties! Oh, I think that I failed to mention that I broke my baby toe three days before I left for this adventure. I only had one pair of loosely fitting boots that were semi comfortable. Or, should I say, bearable! And, suede boots in Florida would have looked ridiculous! 

Shopping in Savannah!
We have never done this particular show in Florida, so all was new to us. I had the same teaching arrangement, so we were plenty busy. There were naturally a lot more women who were retired that attended this show. They all seemed to be having soooo much fun! I guess not having to work anymore and living "on vacation" all the time will do that to you! Lucky ladies! Of course, not everyone who came to the show were in this group! We met so many wonderful sewing sisters in each city. We all have such a bond. Perhaps we should be called "Sisters of the Cloth"! 

Wow, was that a very full month! Will I do it again? Hmm . . . perhaps with a few adjustments! I really missed my hubby!